3rd Gen (2016-Present) Toyota Tacoma Auxiliary Power Kit Installation Instructions - Manual Transmission

Installation Instructions
Overland Equipped Aux Power Kit – 3rd Gen Tacoma – Manual Transmission
1. Thanks for putting us to work on your rig! If you are not confident in your ability to safely install this kit, please consult a professional (Check out the fine print below. Overland Equipped isn’t liable if you injure yourself or your truck, PLEASE BE SAFE!)
2. Disconnect negative battery terminal to prevent frying yourself or your rig!
3. Locate the fender-mounted clutch reservoir bracket (see fig. 1) and remove cylinder by pushing up on the reservoir. Do not disconnect the hose but set reservoir out of the way.
Fig. 1

4. Next remove the two stock bolts on the reservoir bracket on the fender. Save these bolts, you will use them to mount the fuse block bracket.
5. Bolt the reservoir bracket to the relocation bracket (see Fig.2) using the supplied hardware.
Fig. 2

6. Next, loosen, but do not remove the stock bolt where the lower mounting leg for the bracket will sit and slide the bracket into place behind the gold bracket (see Fig. 3). Now check to see if upper mounting holes line up, note there is some adjustability in the slotted design of the lower mount. If the upper mounting holes do not line up, completely remove the lower mounting bolt and install the bracket on top of the gold bracket (see Fig. 4). Do not tighten bolt yet.
Fig 3.

Fig 4.

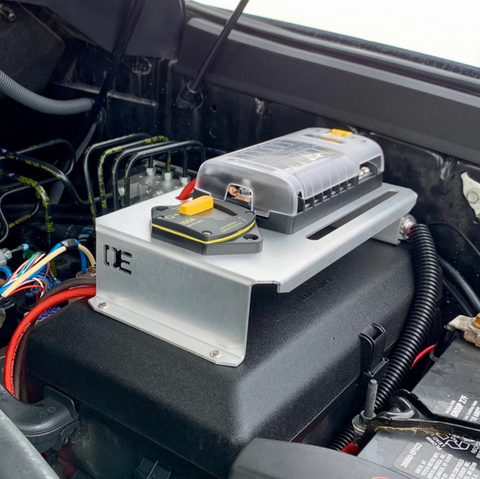
7. Insert larger 8mm bolts through split washer, then flat washer and insert into upper mounting location on mounting bracket near the accessory fuse block already installed on the bracket.
8. Start upper mounting bolts roughly 3-4 turns.
9. Check to ensure the bracket isn’t touching or resting on ANY wires before tightening down the bracket. Return to lower leg bolt and tighten until snug (but do not over-tighten).
10. Return to upper bolts and tighten until split washer is flat, then tighten ¼ turn more.
11. Reinstall the clutch reservoir to the relocated reservoir bracket.
12. Run black fuse block to ground cable behind stock fuse box and connect to nearby existing grounding location (see fig. 5). Ensure routing of cable won’t cause chaffing.
Fig. 5

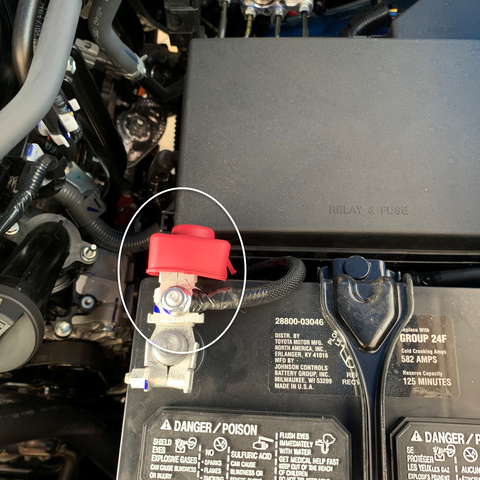
13. Run red positive circuit breaker to battery cable in front of stock fuse box near existing wiring up to near main positive battery connection (see fig. 6). Ensure routing of cable won’t cause chaffing.
Fig. 6
14. Reconnect Main negative battery connection.
15. Be 100% certain your amp draw doesn’t exceed your circuit breaker limit for proper operation and safety sake!
16. You’re done, crack a cold one and connect all your accessories!
Have questions? Contact us at: customers@overlandequipped.com
Check out our other unique products:
Manufactured by Grit Gear LLC under the brand name Overland Equipped. All parts and products are designed to increase off-road or overland capability and are intended for these uses only. Grit Gear LLC cannot be held liable for any unforeseen damage to the vehicle or injuries during use or installation due to gross negligence. Upon purchasing, the buyer accepts full liability for any injury or property damage that may occur while using products manufactured by Grit Gear LLC. If you do not feel confident in your ability to install products, a qualified professional should be employed for installation. Grit Gear LLC will not be responsible for any damage or injury that may occur during installation or use.