Planning Auxiliary Power Setup and Wiring For Your Overland Vehicle
Building a modern overland/expedition vehicle requires a lot of auxiliary power and a little planning to set it up correctly. Afterall, you're going to power multiple LED offroad lights, a winch, compressor, fridge/freezer, and all the in cabin tech—so proper auxiliary power setup is essential.
First thing's first...map out a plan.
We recommend setting up your auxiliary power system as your first step in any overland/expedition build. Begin by mapping out all of the planned accessories you intend to include for your ideal overland/expedition vehicle. Include all lights, supporting electronics, and your intended daily use on the trail (how much power will you really need?). Do a little research about the amp draw for each auxiliary component and begin to add that up to understand your overall system load and power needs. At the same time, map out positions and get some clarity on wiring distances—this is important to understand wiring gauges to support the accessory.
By doing this, you'll understand the number of auxiliary items you need to connect/support, and the overall amp-draw for each, so you can effectively wire up a system that is safe and supports your power needs.
WINCHES: Typically winches should operate on their own circuit directly connected to your battery because of their high load draw. We also recommend a manual battery kill switch in between that connection.
Accessory Power Control
Auxiliary Fuse Block
One of the most common ways to control power and properly protect circuits is with an auxiliary fuse block and max-amp circuit breaker. There's a variety of manufacturers who make auxiliary fuse panels that will support anywhere from 6-12 fuse positions, or 6-12 auxiliary power connections—up to 125amps in total. We recommend the fuse blocks and circuit breakers from Blue Sea Systems as they're durable and easy to set up. We also recommend setups with a negative bus, as they provide a very solid ground (important for proper function and protection) and helps eliminate the need for searching for a solid ground to power your electronics.
Fuses
Each auxiliary connection should be protected by a fuse that is as close to the amp draw for the accessory. For example, if you have a 17 amp light bar, then a 20 amp fuse should be used. No more than 30 amps per fuse position on a standard Blue Sea fuse block. If greater amp protection is necessary, consider a higher capacity circuit breaker instead.
Here's an example of a 12 position fuse block that supports 100 total amps:

Why Include A Circuit Breaker?
Safety. Period. In the event of a system overload or short, you want to make sure you don't blow your entire system and run the risk of starting a fire. We always recommend a circuit breaker that 1) is less than the max amp load of your fuse block panel and 2) just above the maximum amps you will need. For example, if your fuse panel is rated to 125 amps, but you only intend to draw less than 100 amps at ANY given time, then a 100 amp circuit breaker is recommended. This provides proper preventative protection should there be a short or overload in the system. You want that circuit breaker to trip so you can assess and repair if you have a short, ground failure, or overload.
Don't Forget About Relays...
Most accessory switches cannot withstand the constant amp draw that most electronic accessories demand. Even low-amp, modern LED lights. Most switches support 3 amps or less of current draw and therefore require the use of a proper relay to handle and control the load. NEVER hook up a switch without observing the accessory amp load, and amp capacity in the switch. In most cases, you will need a relay to properly connect your switch to your accessory.
Fuse Block Custom Bracket
We've seen a lot of different methods overland enthusiasts mount their fuse block setups. Many fabricate their own fuse block brackets based on where they want to access the fuses for a tucked, clean look. There are a few manufacturers who make custom brackets for fuse block setups. Just Google your make and model. If you have a 5th Gen Toyota 4runner or a Toyota FJ Cruiser, check out the fuse block brackets that we make here.
sPOD
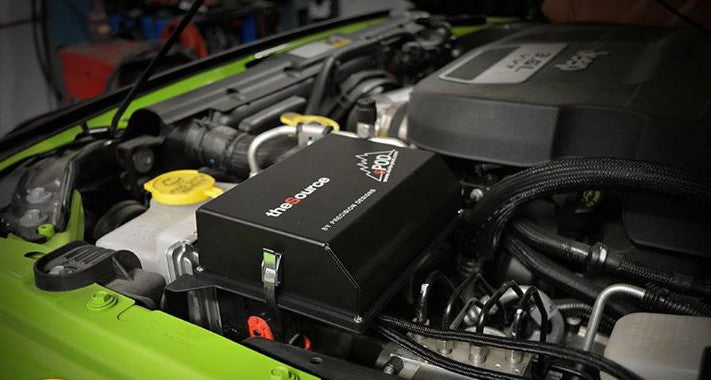
A relatively new technology eliminates the need for fuse blocks altogether. sPODs are amazing little devices and give you even more control in a clean package that's protected up to 30 amps per connection! They're not cheap, however, they include smart technologies like low-voltage cut-off protection so you won't kill your battery when running accessories without solar connection or the vehicle on. They also come with Bluetooth connectivity options for your smartphone. Current models offer up to 8 auxiliary power connections, each protected up to 30 amps and can support up to 100 amps in total.

GAUGING YOUR WIRING NEEDS
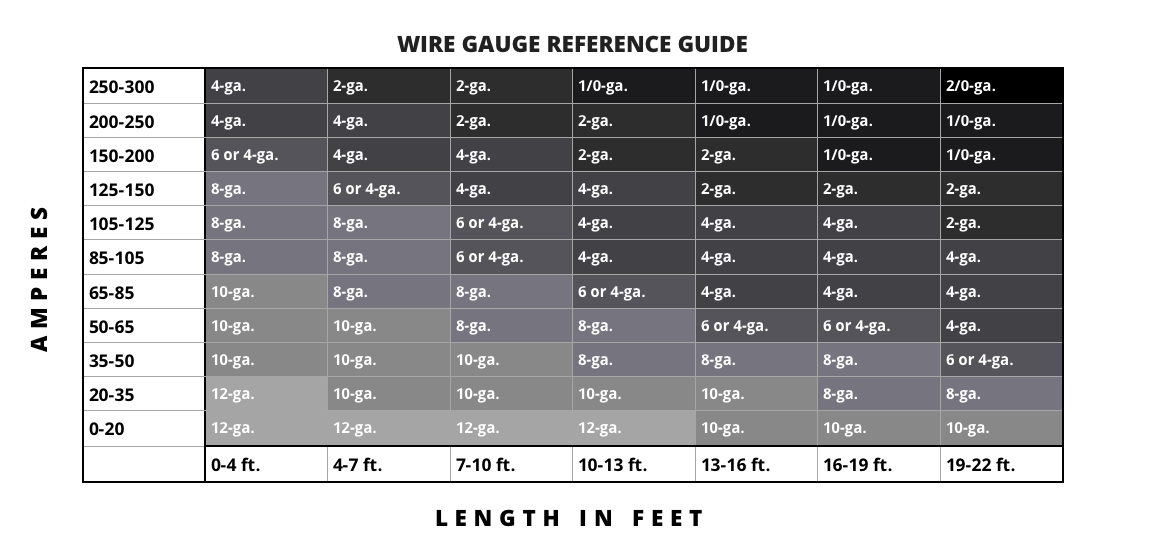
This is the most important step in setting up your auxiliary power setup. Improper gauging can lead to vehicle fires and continuous headaches (like voltage drop) with powering your accessories. There are three factors to consider when selecting wire gauge:
- Amp draw for the accessory and/or overall system
- Distance between accessory and fused power supply
- Wiring material
For the first two factors, a simple guide will help you choose the correct wiring gauge (and length) so you avoid voltage drop and potential fire hazards:
DOWNLOAD VEHICLE WIRING GAUGE CHART:

ALWAYS USE THE SAME GAUGE WIRING FOR POWER AND GROUND.
Wiring Material
For automotive purposes, we recommend stranded copper wire with PVC insulation for the greatest flexibility, conductivity, and durability.
There you have it, if you follow some of the simple tips and recommendations in this post, you'll be well on your way to safely power all the accessories for your overland vehicle.

